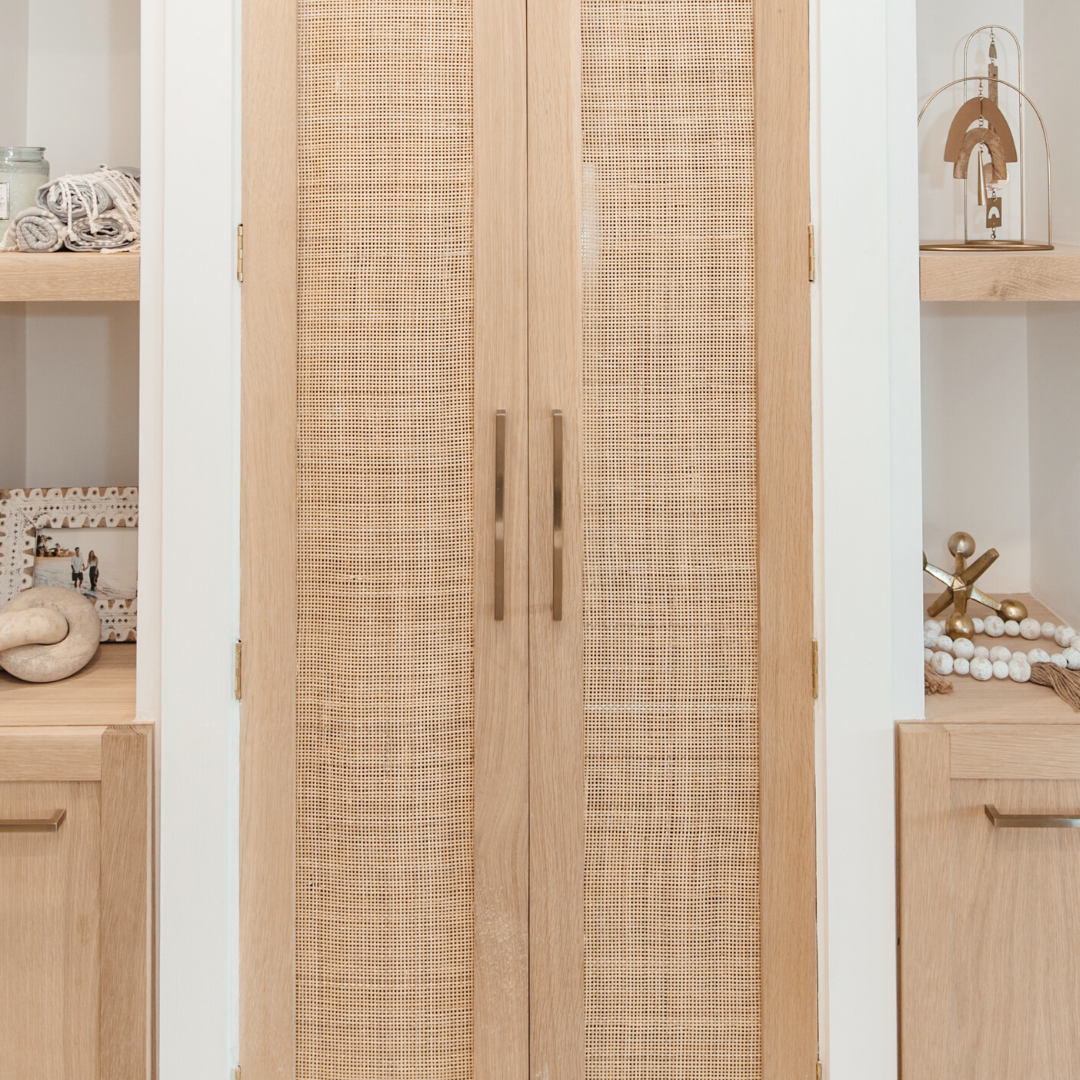
DIY Custom Cane Closet Doors
The One Room Challenge: Week 3
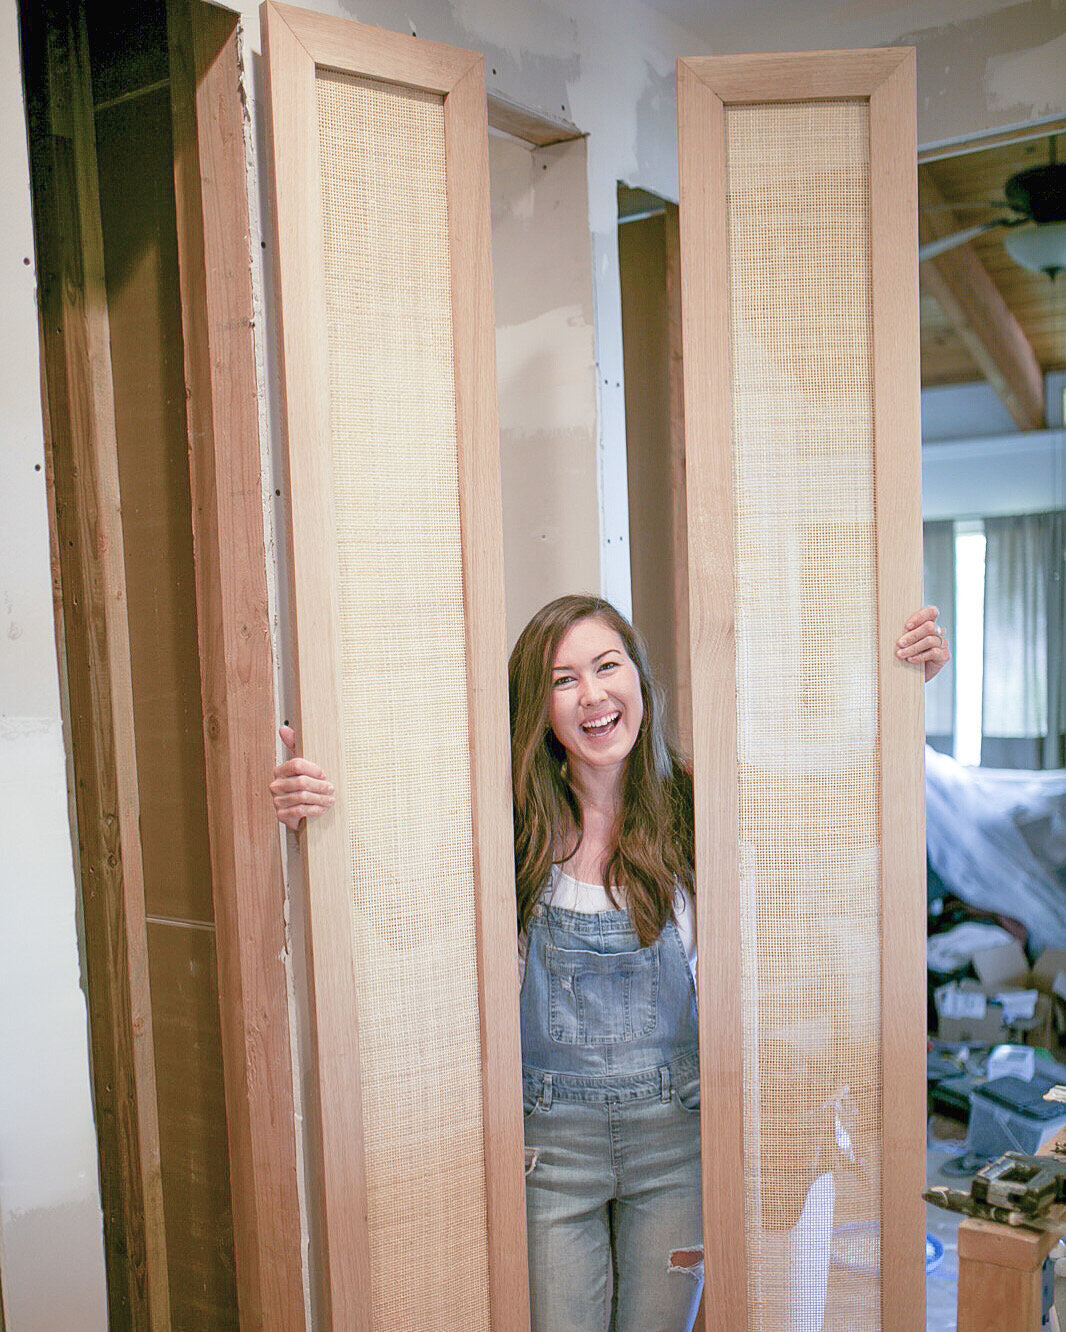
Week 3 of the One Room Challenge is a wrap and boy, was it a doozy. I wanted the doors to our walk in closet to be a design feature, and I had something special in mind. I decided to make two narrow doors out of white oak featuring some caning. I decided to use white oak because of it’s beauty and durability, as well as the way it looks when it absorbs stain. Did you know the same stain color will look totally different on different types of wood? Yup, it’s true. Because I could never seem to get the exact look I wanted on my projects, I did some experimenting and made a video showing how different types of wood absorb different stains differently- you can watch that here and see what type of wood and stain you should get for the project you have in mind.
Ok, back to the making of the doors.
DIY Custom Cane Closet Doors
THE PLAN

The rough opening for our closet door is 28” which means each door will be 13” to allow for the door jam and any required shimming. The height of the doors will be 96”.
Since the door will be very tall and skinny, the faces of wood that make up the frame of the door will be 2.5” wide to give it the right proportional look.

BUDGET & SUPPLIES
Purchased:
Caning = $155
White Oak Lumber = $150
Dowels & drill bit = $7.39
Wood Glue = $5.69
4” Corner Clamps = $16.99
Total Cost of New Supplies = $335.07
We Already Had:
Dowel Jig= $39.99
Pipe Clamps= $13.97 each (x 6)
White Wash Stain= $25.95
Elmer’s Glue= $1.49
THE PROCESS: PURCHASING WOOD FROM A LUMBER STORE
We went to our local lumber store, Architectural Woods Hawaii and picked out some pieces of white oak. Going to a lumber yard will give you a much bigger selection of types of wood as well as plywood- I highly recommend you give it a try. At big box stores lumber is sold as “ dimensional lumber” which means they’re pre-cut to standard sizes like a 2x4. At the lumber store the pieces of wood are sold as varying raw lengths and widths. You basically choose how thick you want your wood to be, and then choose the length of the pieces you want.
My friends at Architectural Woods Hawaii were super helpful and patient with me while I carefully picked through each piece of oak. They explained to me how they organized their wood, and how the sizing worked. They had a huge selection of different types of wood and plywood, I could have spent hours there looking at their samples and products they carry. If you’re local to Oahu, go check them out for sure.

At lumber yards, they categorize the widths of the wood by using quarters.

So I chose (5) 4/4 thick (1”) pieces that were about 8 ft long. I paid ~200 for 5 boards, but I really only needed 4 boards but I bought one extra in case I wanted to make some matching shelves later. Because these pieces of wood are raw and only run through the planer on the front and back, you need to plane the sides so you have a straight edge to work off of. Some lumber yards will do this for you for a small fee. Luckily our cabinet maker was able to plane the wood for us and give us a straight edge on one of the sides of all our pieces of wood, that way we could use our table saw to cut the other side straight.
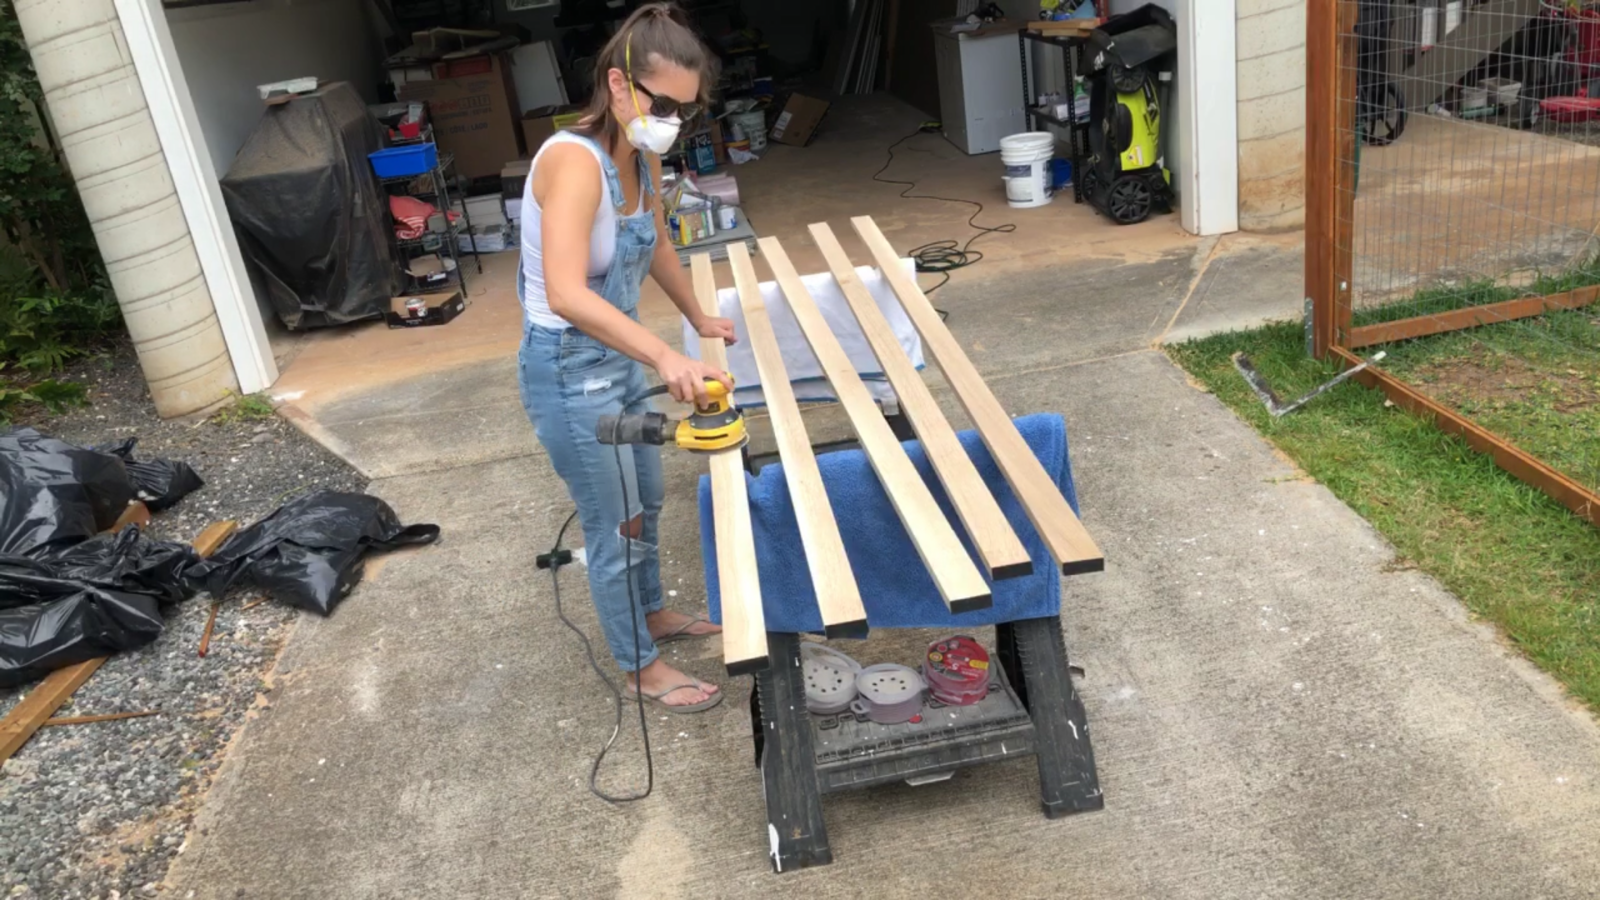
Cutting the wood
After we cut the pieces of wood to the right width, I sanded each piece of wood with my orbital sander, using 80- 120- 220 grit sandpaper. This is what I usually recommend to people when they ask what grit to sand with.
Because I wanted the widths of the doors to be 2.5” I used my table saw and ripped each piece down.
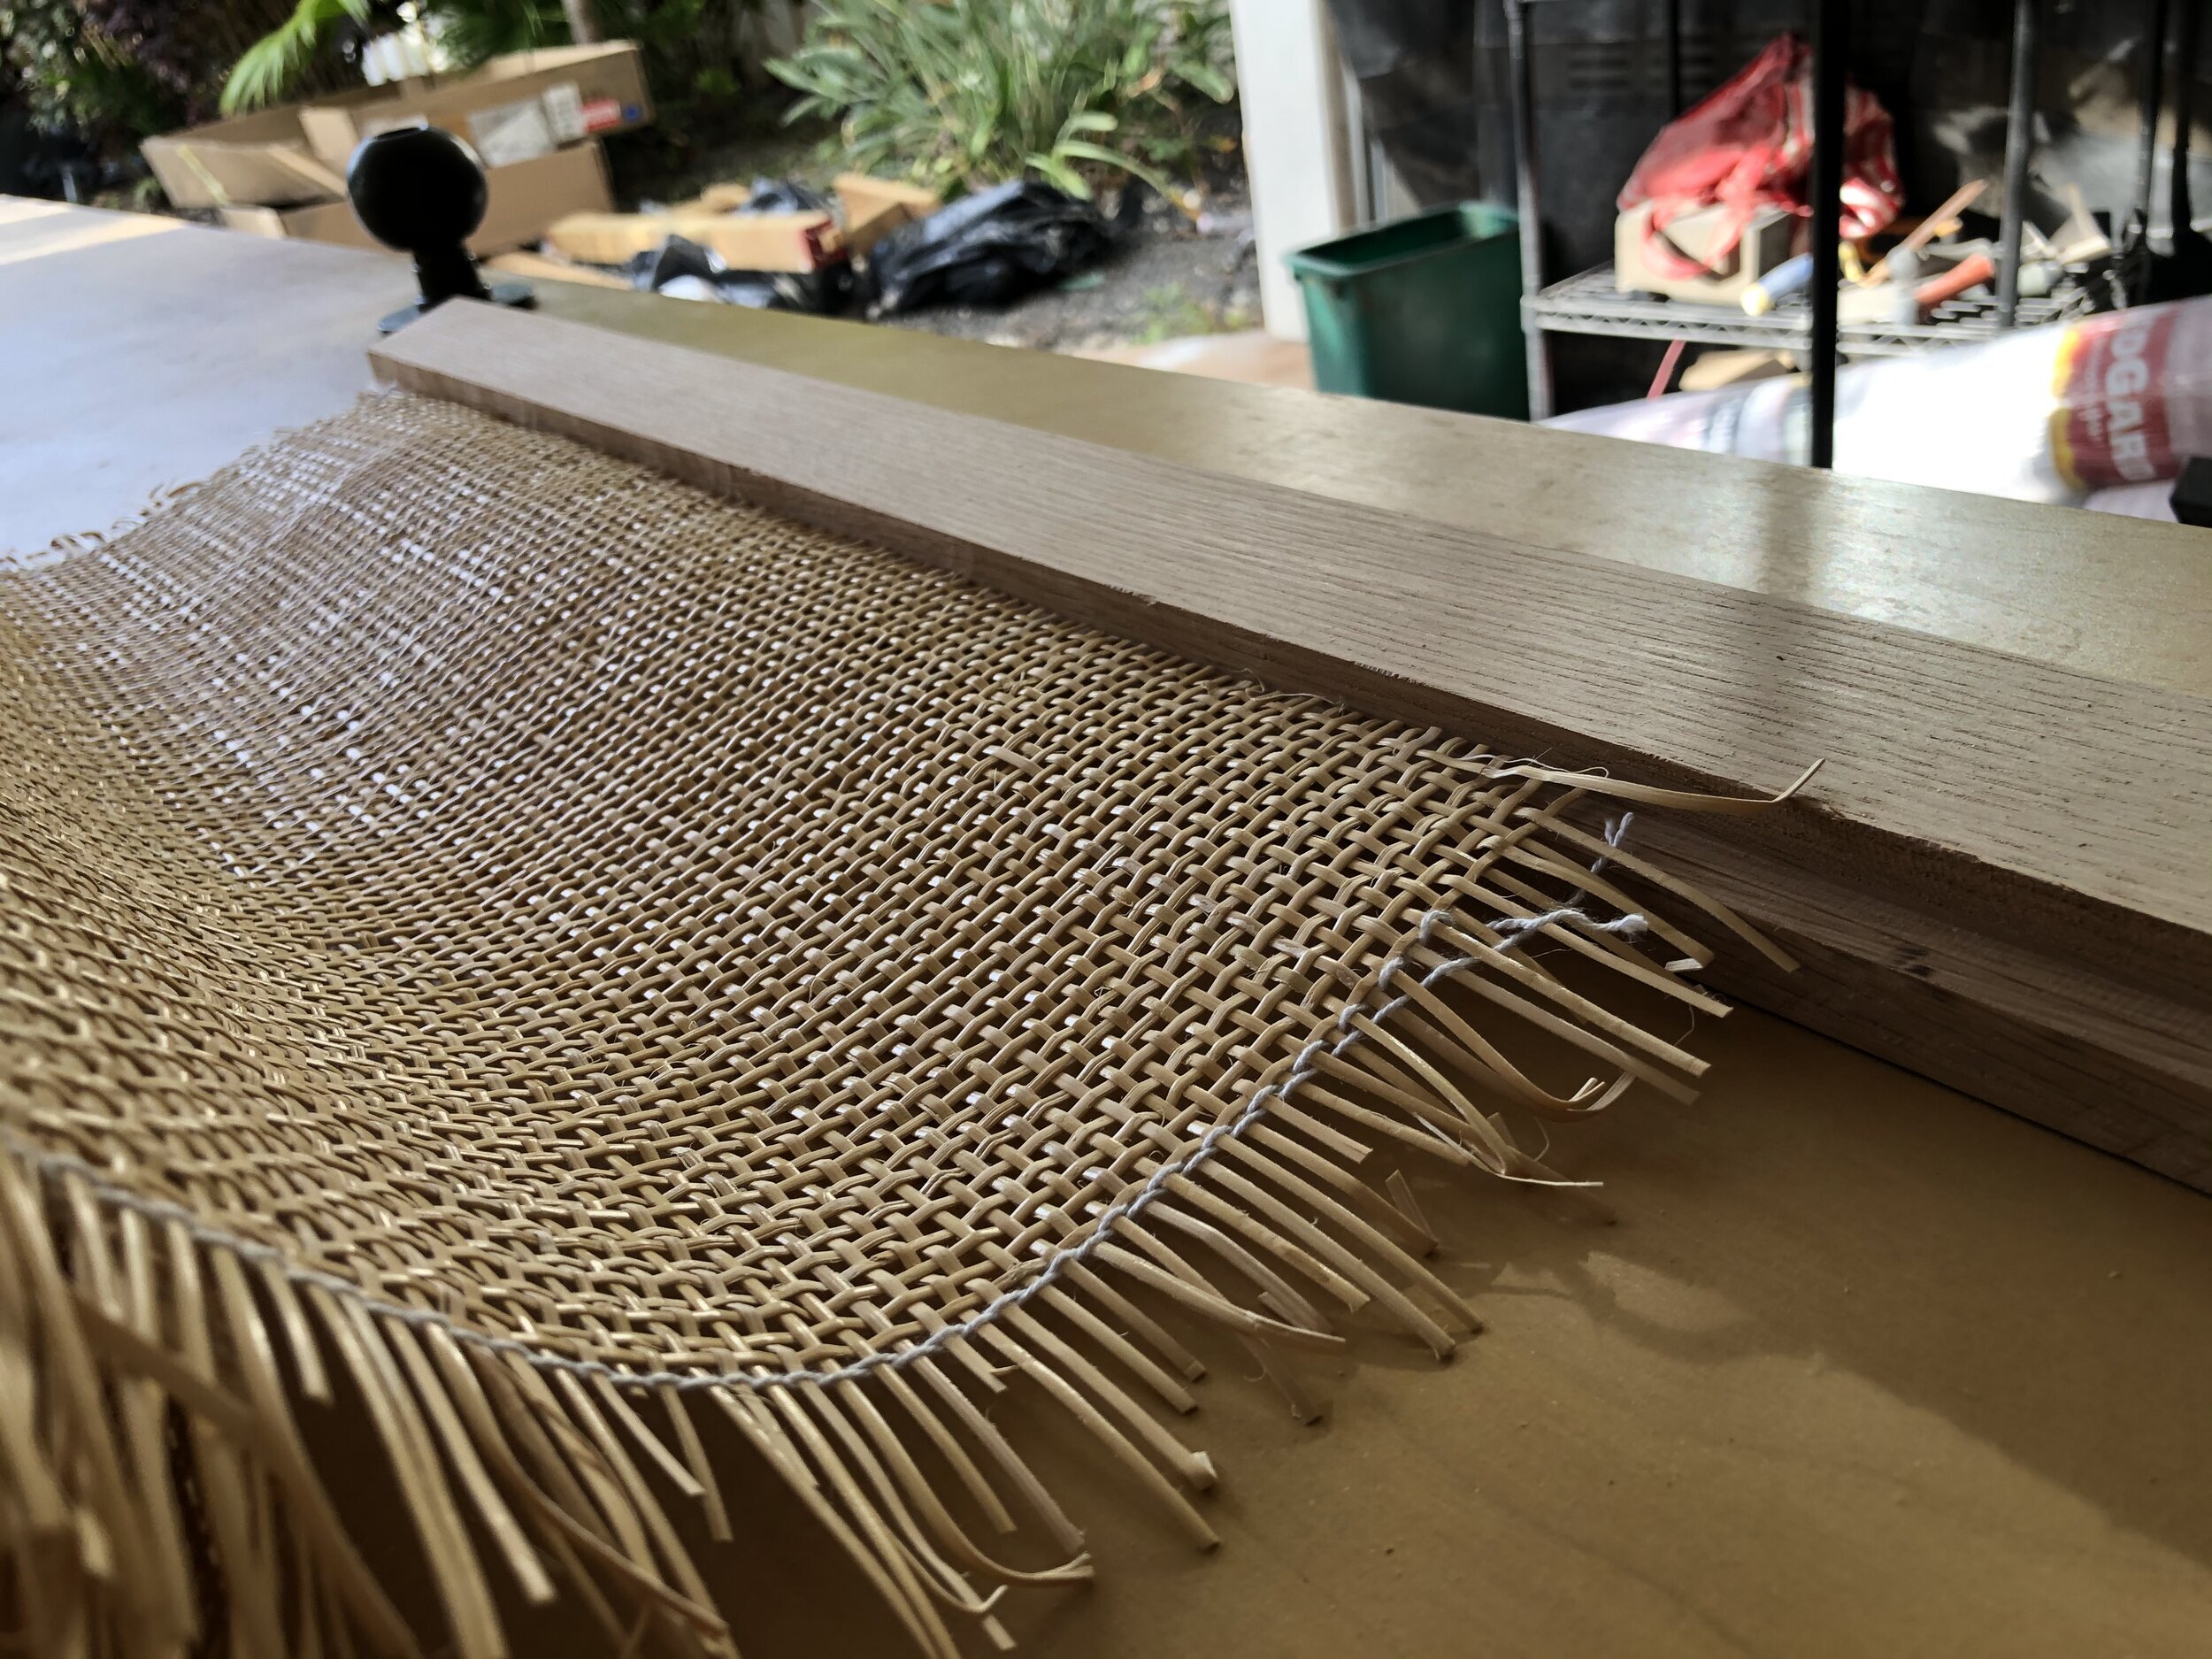
After the sanding, it was time to cut a channel in the back of the wood for my caning to sit. You can skip this step if you don’t have a router, I’ve seen people just staple and glue to the caning to the back face of the wood and it turns out just fine.
We used our router and shaved off little by little until we had about a ¾” space for the caning to sit. After each pass we adjusted our bit higher to take off more wood. If you try to take off too much with the first go, you’ll ruin the router bit like we did during our first pass.


Joining the door together
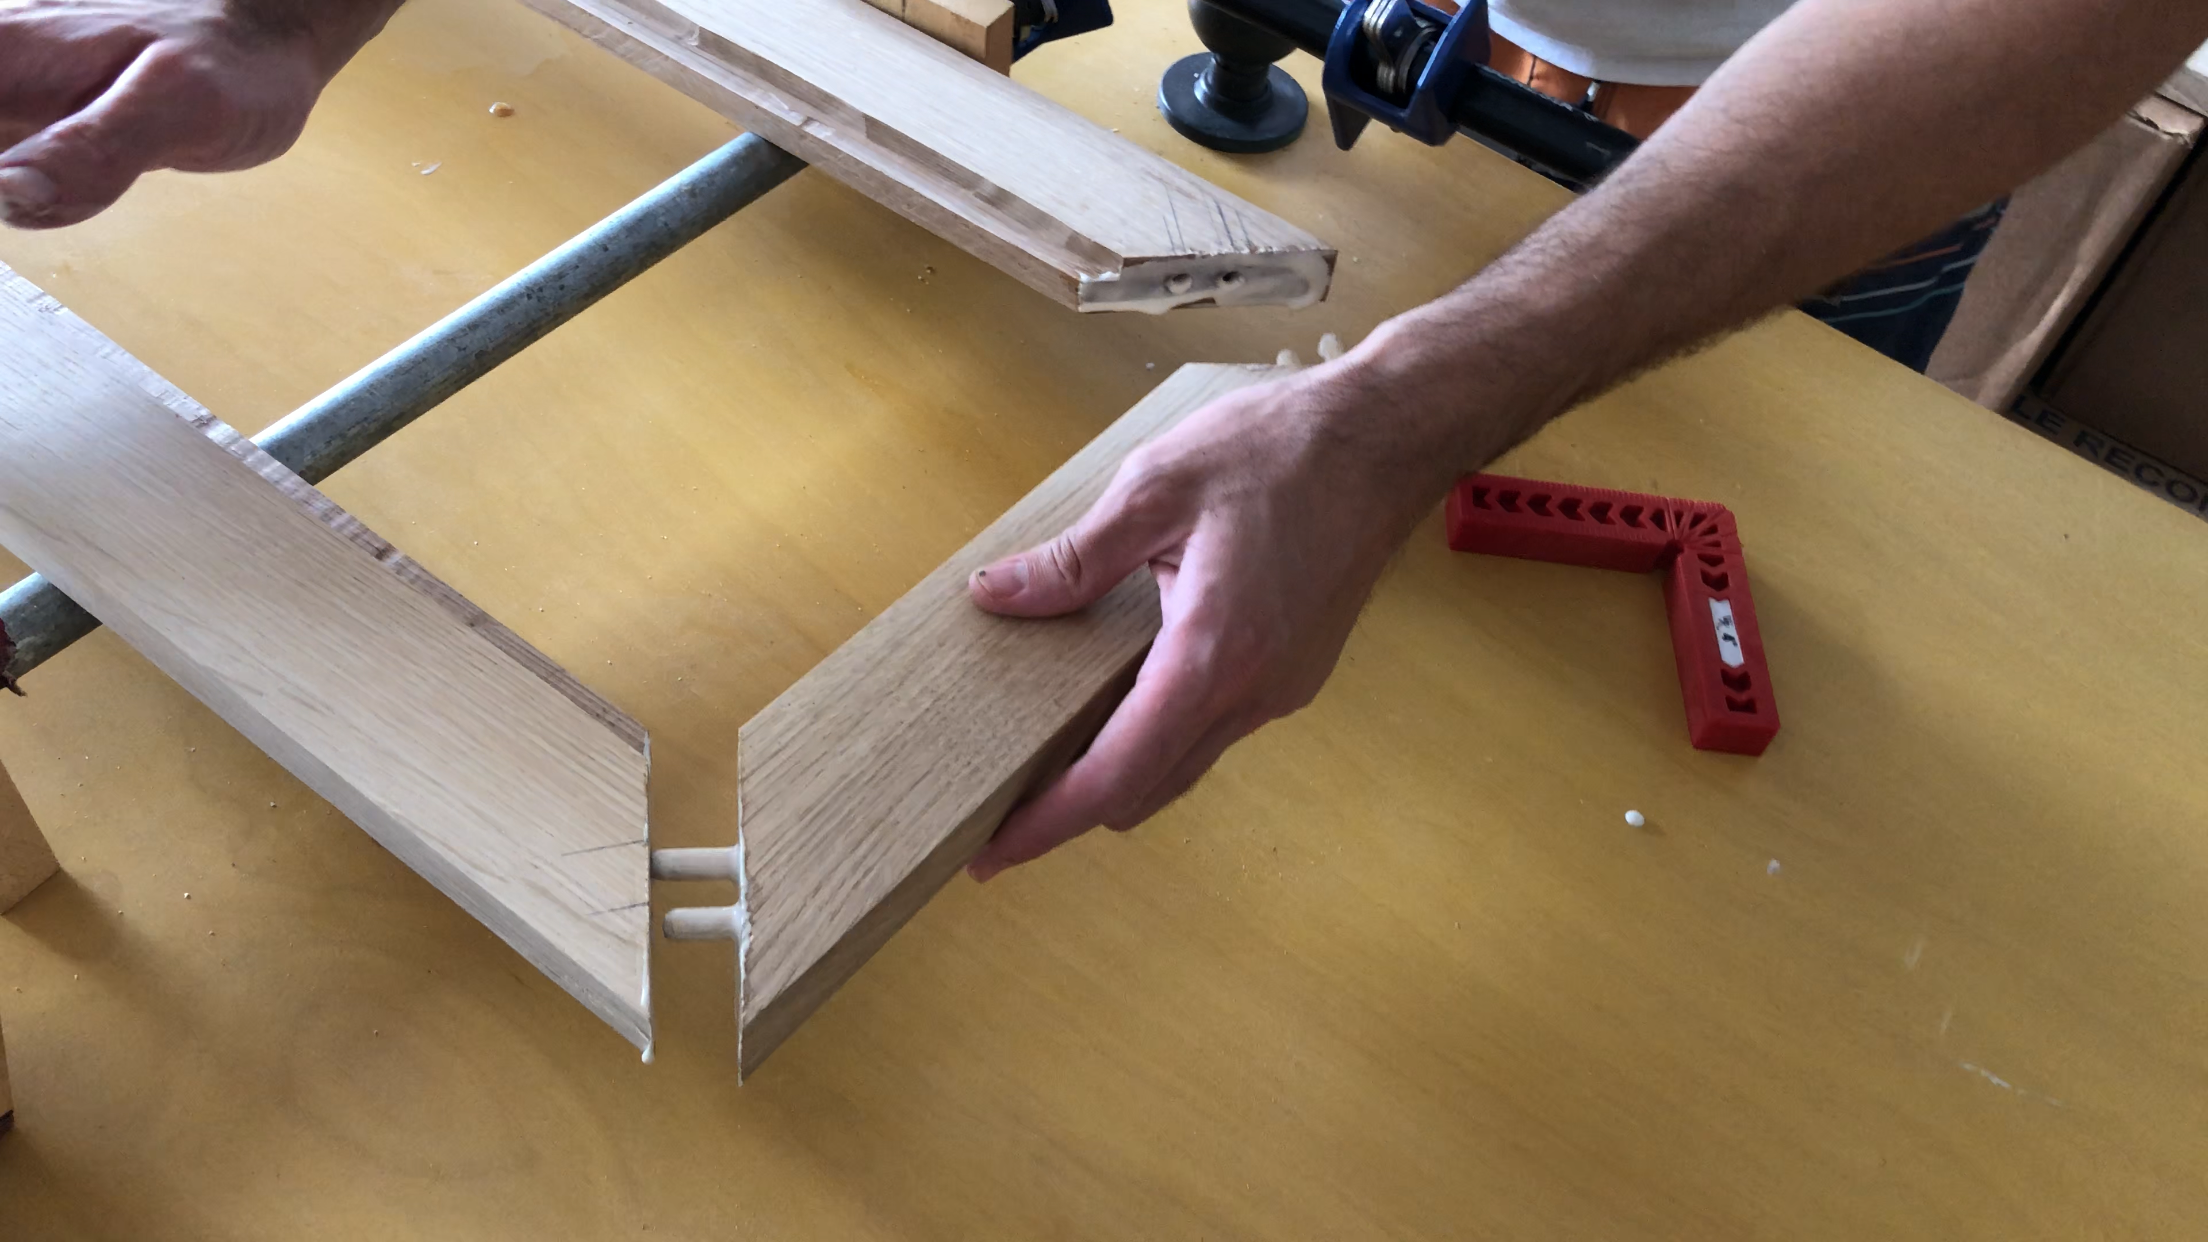
Next I cut 45 degree angles on the ends of the wood so the corners would join together nicely. You don’t have to miter the corners, you can do something called a “butt joint” but I liked the polished look of the miter better .

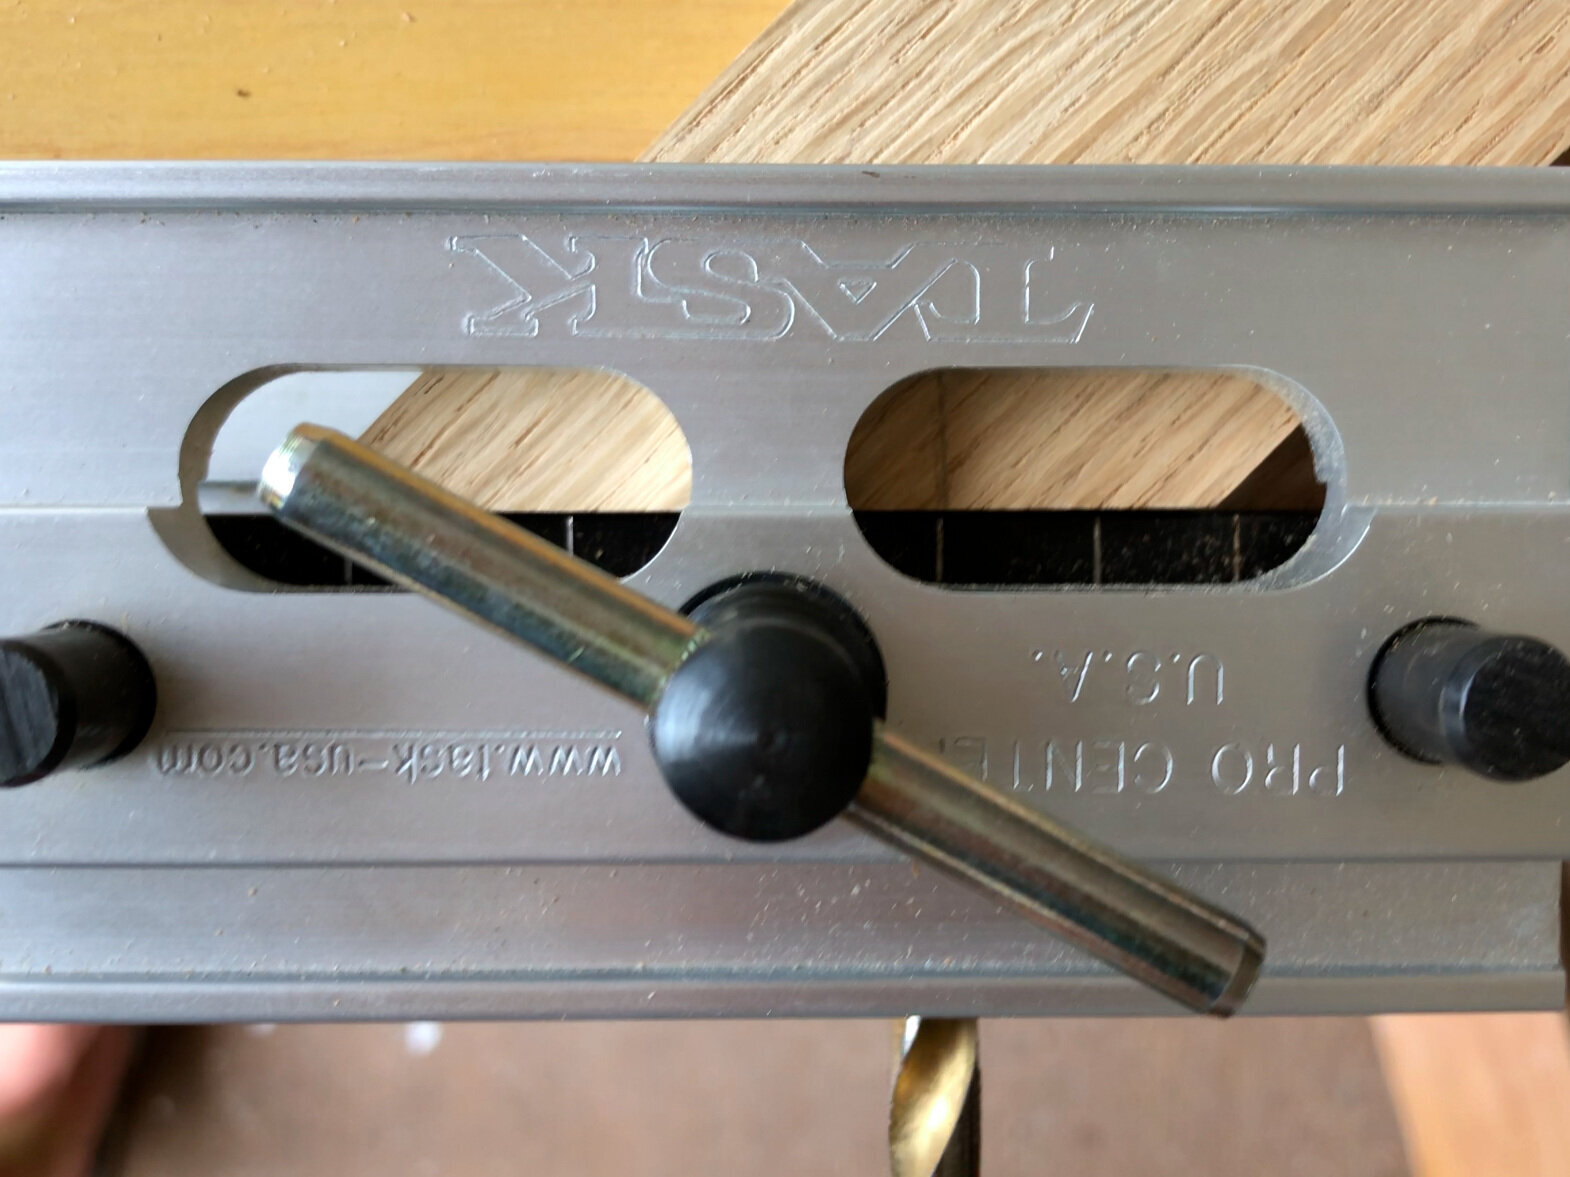
Figuring out how to join the mitered corners of the wood took us some time. There are several different ways to do it, and at first we tried to use dowels using this nifty tool called the dowel jig that we bought at Woodcraft, but we just couldn’t get the pieces of wood flush when we joined them. We then realized that we were using the wrong hole. We had a 5/16th drill bit but we were inserting it in the 3/8th hole and that was our problem. Once we tried again using the ride drill hole, the two corners sat flush- perfect.
Oh also, we weren’t using the right drill bit. The associate at Woodcraft Hawaii knew right away that we would have better success with a brad drill bit because it has a point on it to help with precision- he was right. It worked perfectly. We drilled two holes in each corner of the doors, so each corner would be joined by two dowels.
We applied wood glue to the corners and in the dowel holes, and used pipe clamps to apply pressure using some 90 degree plastic corners that we also bought at Woodcraft to keep everything flush. We also placed some blocking in the middle of the doors to keep it from bowing. We let that sit overnight, and the next day unclamped everything and sanded off the excess glue and smoothed out the corners using 120 and 220 grit sand paper.

APPLYING THE CANE
I bought the caning from Frank’s Cane and Rush Supply located in Huntington Beach, CA. They have a huge selection of types of caning, as well as pictures of the different types of weaves. I liked the look of the Fine Radio Wave, so I got 18 feet of that. First I cut the caning into two long pieces, one for each door. Then per their directions first I soaked the caning for 2 hours in my bath tub. Then I ripped down some thin pieces of wood to secure the caning with Elmer’s glue. I would have used staples, but we didn’t have a staple gun, but the Elmer’s glue ended up working just fine.
Once again we clamped the door overnight and let the cane dry.
We scrounged up for all the clamps we had, and used 10 per door. If we had more I would have used them. When we applied the clamps, glue oozed out the bottom of the door so I made sure to wipe it away, but the glue is easy to sand after it dries anyway. The cane does shrink a little as it dries, so applying it a little looser while wet is actually preferred so it doesn’t bow your wood as it dries. In the picture you can see here how the cane sags a little in the middle while wet.
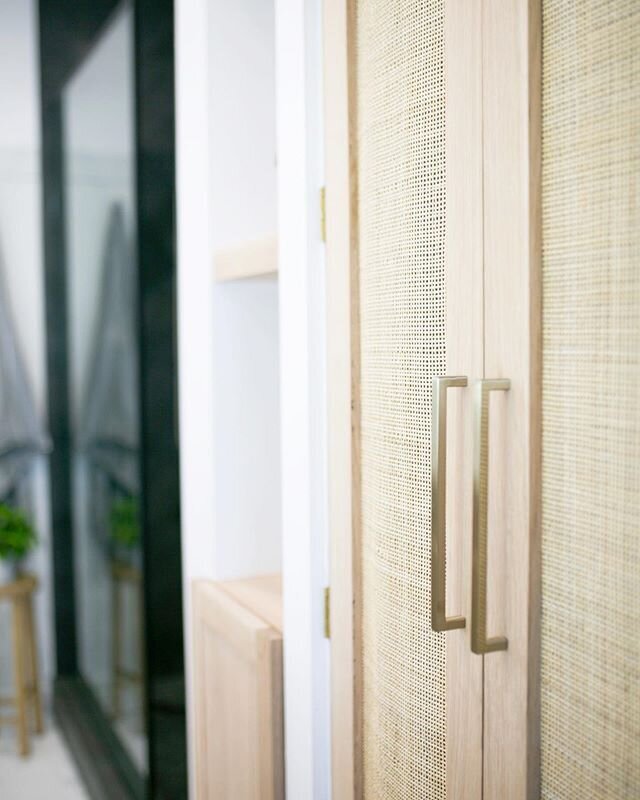
We ended up making our own door jamb due to the custom size of the doors. We added some SKYLIGHT pulls in Elusive Gold Nickel from Hickory Hardware to match our Delta Champagne Bronze shower fixtures. You can find a whole post dedicated to finding matching hardware for Delta’s Champagne Bronze here. I just love how the fixtures look against the white oak wood.
Voila! There you have it, some custom cane doors. Maybe I’ll white wash them, or I may just leave them natural. You can easily adopt this tutorial and add caning to basically anything you want. You can add them to nightstands or set of drawers just to give a few examples. I hope this tutorial gives you some insight on how to make your own doors, and how to work with caning.
S H O P